Showing posts with label Developer Tutorial. Show all posts

Saturday, August 18, 2012

Running Android virtual device - App Development Tutorial

Running Your App on Android virtual device

If you followed the previous tutorial Building your own Android App to create an Android project, you have created your first Hello World Android application source files that allow you to immediately run the app on the Android virtual device.

How you run your app depends on two things:

 Whether you have a real Android-powered device and whether you’re using Eclipse. This tutorial shows you how to install and run your app on a real device and on the Android emulator (Android virtual device), and in both cases with either Eclipse or the command line tools.
Before you run your app, note the various files that make up an Android project in the Package Explorer in Eclipse. 

Android project architecture 

android project architecture

The various folders and their files are as follows:

AndroidManifest.xml
The manifest file describes the fundamental characteristics of the app and defines each of its components.
For example all Activities and Services of the application must be declared in this file. It must also contain the required permissions for the application. For example if the application requires network access it must be specified.

src/
Directory for your app's main source files. By default, it includes an Activity class that runs when your app is launched using the app icon.

res/
Contains several sub-directories for app resources. res directory contains structured values which are known to the Android platform, the assets directory can be used to store any kind of data. You access this data via the AssetsManager which you can access the getAssets() method. AssetsManager allows to read an assets as InputStream with the open() method. 

drawable-hdpi/
Directory for drawable objects (such as bitmaps) that are designed for high-density (hdpi) screens. Other drawable directories contain assets designed for other screen densities.

layout/
Directory for files that define your app's user interface.

values/
Directory for other various XML files that contain a collection of resources, such as string and color definitions.
When you build and run the default Android app, the default Activity class starts and loads a layout file that says "Hello World." The result is nothing exciting, but it's important that you understand how to run your app before you start developing.

Run on the Android virtual device (Emulator)

You are now ready to test your application on the Android emulator. Right-click the project name in Eclipse and select Run As  ->  Android Application .

Run on the Android virtual device (Emulator)

Run on the Android virtual device (Emulator)

If you have not made any mistakes in the project, you should now be able to see the application installed and running on the Android virtual device (emulator).
Run on the Android virtual device (Emulator)


Run on a Real Android Device

If you have a real Android-powered device, here's how you can install and run your app . Visit this link from Google to know how to   Run on a Real Android Device
http://developer.android.com/training/basics/firstapp/running-app.html

Now you can explore some resources and book for increase your knowledge , you can begin with beginner book : Beginning Android 4 Application Development book reviews

Create an Android Project & import samples with Eclipse

Building your own Android App

Welcome to Android Development Tutorial!

This Tutorial teaches you how to build your own (first) Android app. You’ll learn how to create an Android project and how to import the Android app’s project into Eclipse.
Before you start this Tutorial, be sure you have your android development environment set up.

 You need to:

- Download the Android SDK.
- Install the ADT plugin for Eclipse (if you’ll use the Eclipse IDE (.
- Download the latest SDK tools and platforms using the SDK Manager.
We discuss these steps in previous tutorial Android SDK tools and Installing Android ADT Plugin For Eclipse, once you've finished the setup; you're ready to begin this tutorial.
This tutorial teaches you some fundamental concepts about Android development, so it's important that you follow each step.

Creating Your First Android Application


You’ve downloaded the SDK, installed Eclipse, and plugged in the plug-in. You are now ready to start programming for Android. Start by creating a new Android project and setting up your Eclipse run and debug configurations, as described in the following steps.

Creating a New Android Project

To create a new Android project using the Android New Project Wizard, do the following:
- Select File -> New -> Project.
- Select the Android Project application type from the Android folder, and click next.
- In the wizard that appears, enter the details for your new project. On the first page, the Project Name is the name of your project file. You can also select the location your project should be saved.
The next step lets you select the build target for your application. The build target is the version of the Android framework SDK that you plan to develop with. In addition to the open sourced Android SDK libraries available as part of each platform release, Google offers a set of proprietary APIs that offer additional libraries (such as Maps). If you want to use these Google-specific APIs, you must select the Google APIs package corresponding to the platform release you want to target.
The final step allows you to specify the application properties. The Application Name is the friendly name for your application; the Package Name specifies its Java package; the Create Activity option lets you specify the name of a class that will be your initial Activity; and setting the Minimum SDK lets you specify the minimum version of the SDK that your application will run on.

Creating a New Android Project

Creating a New Android Project

Creating a New Android Project

Creating a New Android Project


More details about android PROPERTIES

Project Name: Provide any name of your choice here; I named it ‘Hello World’.
Build Target: This field asks you which version of Android do you want your App to target on. Check any one of your choice. Along with Target Name you can see the API Level (marked in the box) which is numbers representing the level of the Android API. This would be used to specify Min SDK Version field, which we’ll know in few seconds.
Application Name: This is a name which you’d want to give to your final Application. This would be displayed in the phone’s menu and also on title bar of App. You may provide any name of your choice. It's not a mandatory field.
Package Name: This gives a package structure to your App. If you are familiar to java you probably already related it to java package, which is absolutely correct. You may name it anything like ‘android.firstApp’ or ‘com.apps.android.firstApp’. The dots in the package name just provide a hierarchical structure to app.  The package name must have at least two identifiers (dot separated). It's a required field.
Create Activity: We discuss Activities in this tutorial Android Application User Interface tutoril  , but for now I'd like you to know that every App’s function is treated as an activity in android, and you can give a name to your activity. You can have activities and sub-activities in your apps. Again, this is not a mandatory field. Note: It won't allow spaces in this field.
Min SDK Version: Do you remember, we came across this name while talking about ‘Build Target’. This field tells your app to put an extra check on the application that it is only focused on some minimum level of Build Target. This field takes in numeric value corresponding to the API Level of Build target. It would specify that if any target environment is below this Min SDK Version, then this application won't work. This ideally should be equal to the API Level value of the Build Target selected above by you. But this is not a Mandatory field, and so even if you give any other version, it would accept it with a warning message.

The Summary of android PROPERTIES

Project name: The name of the project
Application name: A user-friendly name for your application
Package name: The name of the package. You should use a reverse domain name for this.
Create Activity: The name of the first activity in your application
Min SDK Version: The minimum version of the SDK that your project is targeting

Import the app’s Android project into Eclipse

-  Opening  the Import  Dialog then  Select  File ->  Import…  to  open  the  Import  dialog
- Importing your app’s project (sample code).  In the Import dialog, expand the General node and select Existing Projects into Workspace, then click Next -> to proceed to the Import Projects step. Ensure that Select root directory is selected, and then click the Browse button. In the Browse for Folder dialog, locate the sample folder, select it and click OK. Click Finish to import the project into Eclipse. The project now appears in the Package Explorer window at the left side of the Eclipse window.
Import the app’s Android project into Eclipse

Import the app’s Android project into Eclipse


Thursday, August 16, 2012

Download And Installing Android ADT Plugin For Eclipse


Download And Installing Android ADT Plugin For Eclipse

Previous tutorial  Android SDK tools show you how to install android SDK tools and the Eclips IDE . Now I'm going to complete the steps. First I will show you how to download and install Android ADT Plugin For Eclipse, then how to update the Android ADT Plugin For Eclipse , and finally how to create avd .

Installing the ADT Plugin for Eclipse

Android Development Tools (ADT)

When Eclipse is launched, select Help ->  Install New Software  to install the Android Development Tools (ADT) plug-in for Eclipse.
Installing the ADT Plugin for Eclipse
ADT Plugin for Eclipse   

In the Install dialog that appears, specify https://dl-ssl.google.com/android/eclipse/ and press Enter. After a while, you will see the Developer Tools' item appear in the middle of the window . Expand it to reveal its content: Android DDMS, Android Development Tools, Android Hierarchy Viewer, and Android Traceview. 
Check all of them and click Next twice.

Installing the ADT Plugin
You will be asked to review and accept the  licenses. Check the “I accept the terms of the  license agreements” option and click Finish. Once the installation is completed, you will be asked to  restart Eclipse. Go ahead and restart Eclipse now. 

Installing the ADT Plugin
When Eclipse is restarted, you are asked to configure your Android SDK. As the  Android SDK has already been downloaded earlier In the previous tutorial Android SDK tools , check the “Use existing  SDKs” option and specify the directory where you  have installed the Android SDK. Click Next. 
After this step, you are asked to send your usage statistics to Google. Once you have selected your  choice, click Finish.

For more details about installing the ADT Plugin, go to
And carefully follow developer.android.com/sdk/eclipse-adt.html
the instructions for downloading and installing the ADT Plugin. 
If you have any problems downloading the ADT, check out Google’s help at

Updating the ADT Plugin for Eclipse

In most cases, you can update your ADT plug-in simply as follows:
1.   Navigate to Help -> Check for Updates.
2.   If there are any ADT updates available, they will be presented. Simply select them and choose Install.
Sometimes a plug-in upgrade may be so significant that the dynamic update mechanism can’t be used. In those cases you may have to remove the previous plug-in  completely before installing the newer version.
Updating the ADT Plugin for Eclipse
Updating the ADT Plugin for Eclipse  

Updating the ADT Plugin for Eclipse
Updating the ADT Plugin for Eclipse  

Updating the ADT Plugin for Eclipse
Updating the ADT Plugin for Eclipse  

Updating the ADT Plugin for Eclipse
Updating the ADT Plugin for Eclipse  

Updating the ADT Plugin for Eclipse
Updating the ADT Plugin for Eclipse  

Updating the ADT Plugin for Eclipse
Updating the ADT Plugin for Eclipse  
      

Creating Android Virtual Devices (AVDs) for Use in the Android Emulator


Creating Android Virtual Devices (AVDs)

The Android emulator, included in the Android SDK, allows you to run Android apps in a simulated environment on your computer rather than on an actual Android device. Before running an app in the emulator, you must create an Android Virtual Device (AVD) which defines the characteristics of the device on which you want to test, including the screen size in pixels, the pixel density, the physical size of the screen, size of the SD card for data storage and more. If you want to test your apps for multiple Android devices, you can create separate AVDs that emulate each unique device. To do so, perform the following steps:
To create an AVD, From Eclipse select Window ->  AVD Manager to display the Android Virtual Device Manager window .

Creating Android Virtual Devices (AVDs)
Creating Android Virtual Devices (AVDs)  
 Click New… to display the Create new Android Virtual Device (AVD) window, then configure the optionsas shown and click Create AVD. 

Create new Android Virtual Device
Each AVD you create has many other options specified in its config.ini. You can modify this file as described at 
developer.android.com/guide/developing/devices/managing-avds.html
To more precisely match the hardware configuration of your device.
It is preferable to create a few AVDs with different API levels and hardware configurations so that your application can be tested on different versions of the Android OS. 
Once your ADV has been created, it is time to test it. Select the AVD that you want to test and click the Start… button. The Launch Options dialog will appear. If you have a small monitor, it is recommended that you check the “Scale display to real size” option so that you can set the emulator to a smaller size. Click the Launch button to start the emulator.

AVDs with different API levels
AVDs with different API levels 
Now all tools are ready and you will be able to learn how to write your first Android application!

Download & Installing Android SDK tools - Eclipse Tutorial


Android SDK tools and Eclipse Tutorial

In the previous tutorial we know To develop Android apps you need a Windows®, Linux or Mac OS X system  Android Developer Tools . Now I'm going to download and install Android SDK tools & eclipse tools that required for developing the first app with android.

Installing the Java Development Kit (JDK)

Android requires the Java Development Kit (JDK) version 5 or 6 (JDK 5 or JDK 6). We used JDK 6. To download the JDK for Linux or Windows, go to
You need only the JDK. Be sure to follow the installation instructions at
Recent versions of Mac OS X come with Java SE 6. Be sure to get the latest version by using the Apple menu feature to check for software updates.

Android SDK

Download android sdk

You can download the Android SDK tools from developer.android.com/sdk/index.html
Click the link for your platform. Windows, Mac OS X or Linux to download the SDK’s archive file. Once you’ve downloaded the archive, simply extract its contents to a directory of your choice on your computer. Google recommends that you download the  installer_r20.0.3-windows.exe http://dl.google.com/android/installer_r20.0.3-windows.exe file instead and use it to set up the tools for you automatically. The following steps walk you through the installation process using this approach.
Download android sdk
Download Android SDK

Installing the Android SDK Tools

When you have downloaded the installer_r20.0.3-windows.exe file, double-click it to start the installation of the Android tools. In the welcome screen of the Setup Wizard, click Next to continue If your computer does not have Java installed, you will see the error dialog shown in the picture .
Installing the Android SDK Tools

  
Note : to avoid this error you must Installing the Java Development Kit (JDK) .
You will be asked to provide a destination folder to install the Android SDK tools. Enter a destination path  and click Next.

Installing the Android SDK Tools
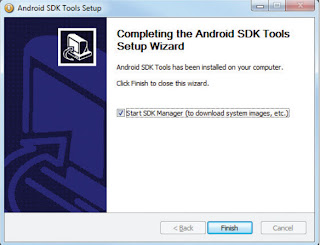
When the setup is done, check the “Start SDK Manager (to download system images, etc.)” option and click Finish. This will start the SDK Manager.
Note : to avoid any problem though installation runs the SDK Manger as administrator .

Installing the Android SDK Tools

Configuring the Android SDK Manager


The Android SDK Manager manages the various versions of the Android SDK currently installed on your computer. When it is launched, you will see a list of items and whether or not they are currently installed on your computer. 
Android SDK Manager
Android SDK Manager

Check the relevant tools, documentation, and platforms you need for your project. Once you have selected the items you want, click the Install button to download them. Because it takes a while to download from Google’s server, it is a good idea to download only what you need immediately, and download the rest when you have more time.

NOTE  For a start, you should at least select the latest Android 4.0 SDK platform and the Extras. 

Each version of the Android OS is identified by an API level number. For example, Android 2.3.3 is level 10 (API 10), while Android 3.0 is level 11 (API 11), and so on. For each level, two platforms are available. For example, level 14 offers the following:
- SDK Platform
- Google APIs by Google Inc.

The key difference between the two is that the Google APIs platform contains additional APIs provided by Google (such as the Google Maps library). Therefore, if the application you are writing requires Google Maps, you need to create an AVD using the Google APIs platform .

You will be asked to choose the packages to install. Check the Accept All options and click Install.


Configuring the Android SDK Manager
The SDK Manager will proceed to download the packages that you have selected. The installation takes some time, so be patient. When all the packages are installed, you will be asked to restart the ADB (Android Debug Bridge). Click Yes.

Installing the Eclipse IDE 


Eclipse is the recommended integrated development environment (IDE) for Android development, though it’s possible to use other IDEs, text editors and command-line tools. To download the Eclipse IDE for Java Developers, go to www.eclipse.org/downloads/ .
This page will allow you to download the latest version of Eclipse and you will see the latest version. To use another version, click the Older Versions' link above the list of downloads. Select the appropriate version for your operating system (Windows, Mac or Linux). To install Eclipse, you simply extract the archive’s contents to your hard drive. 
On our Windows 7 system, we extracted the contents to C:\Eclipse. 

For more Eclipse installation information, see http://wiki.eclipse.org/FAQ_Where_do_I_get_and_install_Eclipse%3F
Note: when you download the example code from some site you need to configure Eclipse to use JDKX (x like 6 or 7) by performing the following steps:

1. Locate the Eclipse folder on your system and double click the Eclipse icon (eclipse.exe) to open Eclipse.
2. When the Workspace Launcher window appears, click OK.
3. Select Window > Preferences to display the Preferences window.
4. Expand the Java node and select the Compiler node. Under JDK Compliance, set Compiler compliance level to x.x(x.x like 1.6 or 1.7 etc ).
5. Close Eclipse.

 Continue to part 2 of tools that required for developing the first app with android .
Installing Android ADT Plugin For Eclipse

Wednesday, August 15, 2012

Build Your Own App With Android Developer Tools


Now that you know what Android is What is Android? and what its feature set contains,  Android Feature you are probably anxious to get your hands dirty and start writing some applications! 
,however Before Build your own app , All you need to start Build your own Android applications is a copy of these android tools Android SDK and the Java Development Kit (JDK). 
Unless you’re a masochist, you’ll probably want a Java integrated development environment (IDE) - Eclipse tools( app creation software) particularly well supported to make development a little bit less painful.

In this article I will focus on an overview about the required Android developer tools and SDKs . in the next article we will learn how to setup and use these tools Installing Android SDK tools.

For Android development, you can use Android development tools  on  Mac, a Windows PC, or a Linux machine. All the tools needed are free and can be downloaded from the Web. Most of the examples provided in this blog should work fine with the Android emulator. For this blog, I am using a Windows 7 computer to demonstrate all  the code samples. If you are using a Mac or Linux computer, the screenshots should look similar; some minor differences may be present, but you should be able to follow along without problems. 

Let us explore the Android development tools !

Android application development tools

JAVA JDK 

If your computer does not have the JDK installed, you should start by downloading it from oracle website . 
-  The Android SDK makes use of the Java SE Development Kit (JDK).
- jdk is the base tools for Android development tools

ANDROID SDK

The first and most important piece of software you need to know about it is the Android SDK. The Android Software Development Kit (SDK) contains the necessary tools to create, compile and package Android application. Most of these tools are command line based.

The Android SDK contains a debugger, libraries, an emulator, documentation, sample code, and tutorials.
- The Android SDK also provides an Android device emulator, so that Android applications can be tested without a real Android phone. 
- You can create Android virtual devices (AVD) via the Android SDK manger, which run in this emulator.
- The Android SDK contains the Android debug bridge (adb) tool which allows to connect to a virtual or real Android device.
For more details about the Android SDK and Android development tools download visit  this link   

Eclipse RESOURCE EDITORS

Eclips is the integrated development environment (IDE) for developing your Android applications. In the case of Android, the recommended IDE is Eclipse, a multi-language software development environment featuring an extensible plug-in system. 
For Android development, you should download the Eclipse IDE for Java EE Developers 

ADT - ANDROID DEVELOPMENT TOOLS

Google provides the Android Development Tools (ADT) to develop Android applications with Eclipse. ADT is a set of components (plug-ins) which extend the Eclipse IDE with Android development capabilities.
ADT contains all required functionalities to create, compile, debug and deploy Android applications from the Eclipse IDE. ADT also allows to create and start AVDs.

DALVIK VIRTUAL MACHINE

The Android system uses a special virtual machine, i.e. The Dalvik Virtual Machine to run Java based applications. Dalvik uses an own bytecode format which is different from Java bytecode.
Therefore you cannot directly run Java class files on Android, they need to get converted in the Dalvik bytecode format.

HOW TO DEVELOP ANDROID APPLICATIONS

To learn  How to build an android app . first let explore code . Android code is written using Java syntax, and the core Android libraries include most of the features from the core Java APIs. Before you can run your projects, you must translate them into Dalvik bytecode. As a result, you get the familiarity of Java syntax while your applications gain the advantage of running on a VM optimized for mobile devices.
- The Java source files are converted to Java class files by the Java compiler.
- The Android SDK contains a tool called dx which converts Java class files into a .Dex (Dalvik Executable) file. 
- All class files of one application are placed in one compressed .Dex file. During this conversion process redundant information in the class files are optimized in the .dex file. For example if the same String is found in different class files, the .dex file contains only once reference of this String. These dex files are therefore much smaller in size than the corresponding class files.
-  The .dex file and the resources of an Android project, e.g. the images and XML files, are packed into an .apk (Android Package) file. The program aapt (Android Asset Packaging Tool) performs this packaging.
The resulting .apk file contains all necessary data to run the Android application and can be deployed to an Android device via the adb tool. The Android Development Tools (ADT) perform these steps transparently to the user.
If you use the ADT tooling you press a button the whole Android application (.apk file) will be created and deployed.

Friday, August 10, 2012

Android Application User Interface & Custom GUI Components


Android user interface (UI and GUI) components

The following gives a short overview of the most important user interface Android components groups

Android Application User Interface And Custom GUI Components
android Components

  Activity

An Activity represents the presentation layer of an Android application. A  simplified description is that an Activity represents a screen in your Android application. Compared to desktop development, Activities are equivalent to Forms. 
- Activity is Your application’s presentation layer.
- An Android application can have several Activities.
- An activity provides a user interface for a single screen in your application .
- Activities can move into the background and then be resumed with their state restored .
- You’ll learn more about Activities later in coming articles.

Views and ViewGroups .

An activity contains  views and ViewGroups. A view is a widget that has an appearance on screen. 
Examples of views (GUI graphical user interface components) are buttons, labels, and text boxes. A view derives from the base class android.view.View . Views have attributes which can be used to configure their appearance and behavior.
A ViewGroup is a special view that can contain other views (called children.) The view group is the base class for layouts and views containers. This class also defines the ViewGroup.LayoutParams class which serves as the base class for layout parameters .
-  A ViewGroup is responsible for arranging other Views.
 - ViewGroups can be nested to create complex layouts. You should not nested ViewGroups too deeply as this has a negative impact on the performance.

Intents

A powerful application message passing framework. Intents are used extensively throughout Android. You can use Intents to start and stop Activities and Services, to broadcast messages system-wide or to an explicit Activity, Service, or Broadcast Receiver, or to request an action be performed on a particular piece of data.
- Intents are asynchronous messages which allow the application to request functionality from other components of the Android system.
- Intent example is the application can call a component directly (explicit Intent) or ask the Android system to evaluate registered components based on the Intent data  ) implicit Intents ). 
- For example the application could implement sharing of data via an Intent and all components which allow sharing of data would be available for the user to select. Applications register themselves to an Intent via an IntentFilter.
- Intents allow to combine loosely coupled components to perform certain tasks.

Services

The invisible workers of your application. Service components run without a UI, updating your data sources and Activities, triggering Notifications, and broadcasting Intents. 
They’re used to perform long running tasks, or those that require no user interaction (such as network lookups or tasks that need to continue even when your application’s Activities aren’t active or visible.) 
- Services perform background tasks without providing a user interface. 
- They can notify the user via the notification framework in Android.

ContentProvider

Shareable persistent data storage. Content Providers manage and persist application data and typically interact with SQL databases. They’re also the preferred means to share data across application boundaries. You can configure your application’s Content Providers to allow access from other applications, and you can access the Content Providers exposed by others. 
- Android devices include several native Content Providers that expose useful databases such as the media store and contacts. 
- Your application can share data with other applications.
- Android contains an SQLite database which is frequently used in conjunction with a ContentProvider. 
- The SQLite database would store the data, which would be accessed via the ContentProvider.

BroadcastReceiver

Intent listeners. Broadcast Receivers enable your application to listen for Intents that match the criteria you specify. Broadcast Receivers start your application to react to any received Intent, making them perfect for creating event-driven applications.
- BroadcastReceiver registered to receive system messages and Intents. 
- BroadcastReceiver will get notified by the Android system, if the specified situation happens. 
- BroadcastReceiver could get called once the Android system completed some event .

HomeScreenWidgets

Visual application components that are typically added to the device home screen. 
A special variation of a Broadcast Receiver, widgets enable you to create dynamic, interactive application components for users to embed on their home screens.
-  Widgets are interactive components which are primarily used on the Android home screen.
- They typically display some kind of data and allow the user to perform actions via them. --- - For example a Widget could display a short summary of new emails and if the user selects an email, it could start the email application with the selected email.


Notifications 

 Notifications enable you to alert users to application events without stealing focus or interrupting their current Activity.
 They’re the preferred technique for getting a user’s attention when your application is not visible or active, particularly from within a Service or Broadcast Receiver. For example, when a device receives a text message or an email, the messaging and Gmail applications use Notifications to alert you by flashing lights, playing sounds, displaying icons, and scrolling a text summary. You can trigger 

Other Android user interface (UI and GUI) components 

Android provides many more components but the list above describes the most important ones. Other Android components are Live Folders and Live Wallpapers .  Live Folders display data on the home screen without launching the corresponding application while Live Wallpapers allow to create animated backgrounds.

Android custom components

Android offers a sophisticated and powerful componentized model for building your UI, based on the fundamental layout classes: View and ViewGroup.
For more details about android custom components check this article  :  Android custom components