Thursday, October 31, 2013

Android 4.4 KitKat and Updated Developer Tools

Posted by Dave Burke, Engineering Director, Android Platform


Today we are announcing Android 4.4 KitKat, a new version of Android that brings great new features for users and developers.


The very first device to run Android 4.4 is the new Nexus 5, available today on Google Play, and coming soon to other retail outlets. We’ll also be rolling out the Android 4.4 update worldwide in the next few weeks to all Nexus 4, Nexus 7, and Nexus 10 devices, as well as the Samsung Galaxy S4 and HTC One Google Play Edition devices.


As part of this release, we kicked off Project Svelte, an effort to reduce the memory needs of Android so that it can run on a much broader range of devices, including entry-level devices that have as little as 512MB RAM. From the kernel to system, frameworks, and apps, we've reduced memory footprint and improved memory management so Android can run comfortably on only 512MB of RAM. We did this not only on Android but across Google apps, like Chrome and YouTube.


By supporting a broader range of devices, Android 4.4 will help move the Android ecosystem forward. Now all users will be able to enjoy the very best that Android has to offer, on the devices that best meet their needs.


Here’s a quick look at some of the new features for developers:


  • New ways to create beautiful apps — A new full-screen immersive mode lets your app or game use every pixel on the screen to showcase content and capture touch events. A new transitions framework makes it easier to animate the states in your UI. Web content can take advantage of a completely new implementation of WebView built on Chromium.


  • More useful than ever — A printing framework lets you add the convenience of printing to your apps. A storage access framework makes it easier for users find documents, photos, and other data across their local and cloud-based storage services. You can integrate your app or storage service with the framework to give users instant access to their data.


  • Low-power sensors — New hardware-integrated sensors let you add great new features to your apps without draining the battery. Included are a step detector and step counter that let you efficiently track of the number of walking steps, even when the screen is off.


  • New media capabilities — A new screen recorder lets you capture high-quality video of your app directly from your Android device. It's a great new way to create walkthroughs, tutorials, marketing videos, and more. Apps can use adaptive playback to offer a significantly better streaming video experience.


  • RenderScript in the NDK — A new C++ API in the Android Native Development Kit (NDK) lets you use RenderScript from your native code, with access to script intrinsics, custom kernels, and more.


  • Improved accessibility support — New system-wide captioning settings let your apps present closed captions in the style that's preferred by the user.


There's a lot more, so be sure to check out the Android 4.4 platform highlights for a complete overview of those and other new capabilities for developers. For details on the APIs and how to use them, take a look at the API Overview or watch one of the new DevBytes videos on KitKat.


Along with the new Android 4.4 platform we're releasing a new version of the Android NDK (r9b). The new NDK gives you native access to RenderScript and other stable APIs in Android 4.4, so if you've been waiting to use RenderScript from your native code, give it a try.


Last, we've updated the Support Package (r19) with a new helper library for printing images through the new printing framework, as well as other updates.


You can get started developing and testing on Android 4.4 right away, in Android Studio or in ADT/Ant. You can download the Android 4.4 Platform (API level 19), as well as the SDK Tools, Platform Tools, and Support Package from the Android SDK Manager.


Google Play Services 4.0

Today we're launching a new release of Google Play services. Version 4.0 includes the Google Mobile Ads SDK, and offers improvements to geofencing, Google+, and Google Wallet Instant Buy APIs.


With over 97% of devices now running Android 2.3 (Gingerbread) or newer platform versions, we’re dropping support for Froyo from this release of the Google Play services SDK in order to make it possible to offer more powerful APIs in the future. That means you will not be able to utilize these new APIs on devices running Android 2.2 (Froyo).


We’re still in the process of rolling out to Android devices across the world, but you can already download the latest Google Play services SDK and start developing against the new APIs using the new Android 4.4 (KitKat) emulator.


Google Mobile Ads


If you’re using AdMob to monetize your apps, the new Google Mobile Ads SDK in Google Play services helps provide seamless improvements to your users. For example, bug fixes get pushed automatically to users without you having to do anything. Check out the post on the Google Ads Developer Blog for more details.


Maps and Location Based Services


The Maps and Geofencing APIs that launched in Google Play services 3.1 have been updated to improve overall battery efficiency and responsiveness.


You can save power by requesting larger latency values for notifications alerting your app to users entering or exiting geofences, or request that entry alerts are sent only after a user stays within a geofence for a specified period of time. Setting generous dwell times helps to eliminate unwanted notifications when a user passes near a geofence or their location is seen to move across a boundary.


The Maps API enhances map customization features, letting you specify marker opacity, fade-in effects, and visibility of 3D buildings. It’s also now possible to change ground overlay images.


Google+ and Google Wallet Instant Buy


Apps that are enabled with Google+ Sign-In will be updated with a simplified sign-in consent dialog. Google Wallet Instant Buy APIs are now available to everyone to try out within a sandbox, with a simplified API that streamlines the buy-flow and reduces integration time.


Google Wallet Instant Buy also includes new Wallet Objects, which means you can award loyalty points to a user's saved rewards program ID for each applicable Google Wallet Instant Buy purchase.


New user control over advertising identifier


To give users better controls and to provide you with a simple, standard system to continue to monetize your apps, this update contains a new, anonymous identifier for advertising purposes (to be used in place of Android ID). Google Settings now includes user controls that enable users to reset this identifier, or opt out of interest-based ads for Google Play apps.


More About Google Play Services


To learn more about Google Play services and the APIs available to you through it, visit the Google Services area of the Android Developers site.


Android for all and the new Nexus 5

Just in time for Halloween, we have two new treats for Android fans. First, we're excited to unwrap our latest platform release, KitKat, which delivers a smarter, more immersive Android experience to even more people. And second, we're introducing Nexus 5—a new Nexus phone developed with LG.

The first thing you’ll notice about KitKat is we’ve made the experience much more engaging: the book you're reading, the game you're playing, or the movie you're watching—now all of these take center stage with the new immersive mode, which automatically hides everything except what you really want to see.

Bringing more Google smarts to Android 
Behind the polish on the screen is the power under the hood. Take the Phone app, which for most people hasn’t really changed since the days of flip phones. Now, we’re making calling easier than ever, by helping you search across your contacts, nearby places, or even Google Apps accounts (like your company’s directory), directly from within the app. And with the new Hangouts app, all of your SMS and MMS messages are together in the same place, alongside your other conversations and video calls, so you’ll never miss a message no matter how your friends send it. This is just a small taste of KitKat—learn more on our site.

Google has always focused on helping users get immediate access to the information they need, and we want to bring this same convenience and power to users on Android. With the new Nexus 5 launcher, Google smarts are deeply integrated into the phone you carry around with you, so getting to the information you need is simple, easy and fast. Swipe once from the home screen to get Google Now literally at your fingertips. Put Google to work for you by saying “OK, Google” to launch voice search, send a text, get directions or even play a song you want to hear. And in the coming weeks, we’re enhancing Now with important new card types that bring you information about contextual topics that interest you such as updates from a favorite website or blog.

Reaching the next 1 billion users 
Building a platform that makes mobile phones accessible for everyone has always been at the heart of Android. Until now, some lower-end Android phones couldn't benefit from more recent Android releases due to memory constraints. With KitKat, we've slimmed down Android’s memory footprint by doing things like removing unnecessary background services and reducing the memory consumption of features that you use all the time. We did this not only within Android but across Google services like Chrome and YouTube. RAM (or memory) is one of the most expensive parts of a phone, and now Android can run comfortably on the 512MB of RAM devices that are popular in much of the world, bringing the latest goodies in Android 4.4 within reach for the next billion smartphone users.

Introducing Nexus 5 
Along with our sweet naming tradition, we also introduce a new device with each platform release to showcase the latest Android innovations. For KitKat, we partnered with LG to develop Nexus 5 -- the slimmest and fastest Nexus phone ever made. Its design is simple and refined to showcase the 5” Full HD display. Nexus 5 also keeps you connected at blazing speeds with 4G/LTE and ultra fast wifi. The advanced new lens on Nexus 5 captures more light for brighter night and sharper action shots. And with optical image stabilization, you no longer have to worry about shaky hands and blurry pictures. A new HDR+ mode automatically snaps a rapid burst of photos and combines them to give you the best possible single shot. Learn more on our site.


Nexus 5 is available today, unlocked and without a contract, on Google Play in the U.S., Canada, U.K., Australia, France, Germany, Spain, Italy, Japan and Korea (and coming soon to India), starting at $349. Just in the time for the holidays, Nexus 5 will be available soon at the following retailers: Sprint, T-Mobile, Amazon, Best Buy and RadioShack.

Android 4.4, KitKat, which comes on Nexus 5, will also soon be available on Nexus 4, 7, 10, the Samsung Galaxy S4 and HTC One Google Play edition devices in the coming weeks.

How’s that for a treat?

Posted by Sundar Pichai, SVP, Android, Chrome & Apps

NotePad

In this post, you will learn to create a simple NotePad app for Android. The NotePad app can be used to view files that contain text inside. These files can be txt, html, xml, and java files. You can open the app and then browse for a file to open or alternatively you can select a file from Android to open. The current document can be edited and saved. The user can create a new file by clicking the new document icon from the action bar. The new file will be stored in the notes directory of external card of the device.

NotePad for Android


To start developing the NotePad app, now you need to create a new project. The project name will be NotePad. There are two activities in this app. The first one is the MainActivity that firstly runs when the NotePad opens. This activity represents the interface that allows the user to select a file to open.

NotePad browse for file


This MainActivity will list files and folders in the external card of the device. Below is the content of the activity_main.xml file. In this file, one ListView component is defined. The ListView will display the list of files and folders for selection.

activity_main.xml file

<RelativeLayout xmlns:android="http://schemas.android.com/apk/res/android"
    xmlns:tools="http://schemas.android.com/tools"
    android:layout_width="match_parent"
    android:layout_height="match_parent"
    android:paddingBottom="@dimen/activity_vertical_margin"
    android:paddingLeft="@dimen/activity_horizontal_margin"
    android:paddingRight="@dimen/activity_horizontal_margin"
    android:paddingTop="@dimen/activity_vertical_margin"
    tools:context=".MainActivity" >

    <ListView
            android:id="@+id/files_list"
            android:layout_width="match_parent"
            android:layout_height="match_parent"
            android:paddingBottom="5dp"
            android:paddingTop="5dp"
     
            />

</RelativeLayout>


Each row or item of the ListView displays both image and text. The image will be the file icon image or directory image. Thus it must be customized to work in this way. When customizing the ListView, as i mentioned in the previous posts, you need to define the layout file of the list and the data source of the list. Here is the content of the listlayout.xml file of the list.

listlayout file

<?xml version="1.0" encoding="utf-8"?>
<!--  Single List Item Design -->
<LinearLayout xmlns:android="http://schemas.android.com/apk/res/android"
    android:layout_width="fill_parent"
    android:layout_height="wrap_content"
    android:orientation="horizontal"
    android:padding="5dip" >

<ImageView
    android:id="@+id/icon"
    android:layout_width="30dp"
    android:layout_height="30dp"
    android:padding="5sp"
    android:contentDescription="icon_image"
 />

<TextView
    android:id="@+id/label"
        android:layout_width="wrap_content"
        android:layout_height="wrap_content"
        android:padding="10sp"
        android:textSize="20sp"
        android:textColor="#0000ff"
        android:textStyle="bold" >
</TextView>
</LinearLayout>


The data source of the list will be an instance of the class that extends the ArrayAdapter class. I call it ListAdapterModel class. You can download the ListAdapterModel.java file from here.
To get explanation about customizing the data source of the ListView, you might want to read the File Chooser post.

When a file is selected from the list, another activity will open and the content of the file is shown there. The data to be sent from the MainActity of the second activity (NoteActivity) is the full path of the file. The openNoteActivity method of the MainActivity class will be called to send the path file to the NoteActivity. Click the MainActivity to download the MainActivity.java file.
On the NoteActivity, you will see the content of the selected file. The EditText component is used to display the file content and allow the user to edit the content. Below is the layout file of the NoteActivity.

activity_note.xml file

<?xml version="1.0" encoding="utf-8"?>
<RelativeLayout xmlns:android="http://schemas.android.com/apk/res/android"
    xmlns:tools="http://schemas.android.com/tools"
    android:layout_width="match_parent"
    android:layout_height="match_parent"  
    android:background="#dfdfdf"    
     >

 <EditText
     android:id="@+id/txt_view"
     android:layout_width="match_parent"
     android:layout_height="match_parent"
     android:scrollbars="vertical"  
     android:textColor="#000000"
     android:gravity="top"
     android:inputType="text"
     android:textSize="16sp" />

</RelativeLayout>

You can download the NoteActivity.java file from here. The NoteActivity has an action bar. To support the old Android versions, the NotePad app uses the SherlockActionBar library to set up the action bar. You might want to read TexViewer to learn how to import this library in to your project. On the action bar, there are four items. The first item represented by the new document icon will be clicked to call the createNew method so that a new blank document will open. The second item allows you to save the edited document by calling the saveWork document. The third and forth items allow you to zoom in or zoom out the content of the current document by calling the zoomin and zoomout methods.. The items of the action bar are defined in the note.xml file that is stored in the menu folder of the project.

note.xml file

<menu xmlns:android="http://schemas.android.com/apk/res/android"
    style="@style/Theme.Sherlock"
    >
 
    <item
        android:id="@+id/newitem"
        android:icon="@drawable/new_icon"
        android:title="new"
        android:showAsAction="always"
        style="@style/Theme.Sherlock"
     
    />
    <item
        android:id="@+id/saveitem"
        android:title="save"
        android:showAsAction="always"
        android:icon="@drawable/save_icon"
        style="@style/Theme.Sherlock"
    />
    <item
        android:id="@+id/zoomin"
        android:title="zoomin"
        android:showAsAction="always"
        android:icon="@drawable/zoomin"
        style="@style/Theme.Sherlock"
    />

    <item
        android:id="@+id/zoomout"
        android:title="zoomout"
        android:showAsAction="always"
        android:icon="@drawable/zoomout"
        style="@style/Theme.Sherlock"
    />

</menu>

Before running the NotePad app, you need to edit the AndroidManifest file of the project to allow the app to use the external sdcard and to register the app in the list of avaiable apps to open the selected file. Here is the content of the AndroidManifest.xml file.

AndroidManifest.xml file

<?xml version="1.0" encoding="utf-8"?>
<manifest xmlns:android="http://schemas.android.com/apk/res/android"
    package="com.example.notepad"
    android:versionCode="1"
    android:versionName="1.0" >

    <uses-sdk
        android:minSdkVersion="8"
        android:targetSdkVersion="17" />
    <uses-permission android:name="android.permission.WRITE_EXTERNAL_STORAGE" />

    <application
        android:allowBackup="true"
        android:icon="@drawable/note_icon"
        android:label="@string/app_name"
        android:theme="@style/Theme.Sherlock.Light.DarkActionBar" >
        <activity
            android:name="com.example.notepad.MainActivity"
            android:configChanges="orientation"
            android:label="@string/app_name" >
            <intent-filter>
                <action android:name="android.intent.action.MAIN" />

                <category android:name="android.intent.category.LAUNCHER" />
            </intent-filter>
            <intent-filter>
                <action android:name="android.intent.action.VIEW" />
                <action android:name="android.intent.action.PICK" />

                <category android:name="android.intent.category.DEFAULT" />
                <category android:name="android.intent.category.BROWSABLE" />

                <data android:scheme="file" />
                <data android:mimeType="*/*" />
                <data android:pathPattern=".*\\.txt" />
                <data android:host="*" />
            </intent-filter>
            <intent-filter>
                <action android:name="android.intent.action.VIEW" />

                <category android:name="android.intent.category.DEFAULT" />
                <category android:name="android.intent.category.BROWSABLE" />

                <data android:scheme="file" />
                <data android:mimeType="*/*" />
                <data android:pathPattern=".*\\.rtf" />
                <data android:host="*" />
            </intent-filter>
            <intent-filter>
                <action android:name="android.intent.action.VIEW" />

                <category android:name="android.intent.category.DEFAULT" />
                <category android:name="android.intent.category.BROWSABLE" />

                <data android:scheme="file" />
                <data android:mimeType="*/*" />
                <data android:pathPattern=".*\\.java" />
                <data android:host="*" />
            </intent-filter>
            <intent-filter>
                <action android:name="android.intent.action.VIEW" />

                <category android:name="android.intent.category.DEFAULT" />
                <category android:name="android.intent.category.BROWSABLE" />

                <data android:scheme="file" />
                <data android:mimeType="*/*" />
                <data android:pathPattern=".*\\.xml" />
                <data android:host="*" />
            </intent-filter>
            <intent-filter>
                <action android:name="android.intent.action.VIEW" />

                <category android:name="android.intent.category.DEFAULT" />
                <category android:name="android.intent.category.BROWSABLE" />

                <data android:scheme="file" />
                <data android:mimeType="*/*" />
                <data android:pathPattern=".*\\.html" />
                <data android:host="*" />
            </intent-filter>
            <intent-filter>
                <action android:name="android.intent.action.PICK" />

                <category android:name="android.intent.category.DEFAULT" />
                <category android:name="android.intent.category.BROWSABLE" />

                <data android:scheme="file" />
                <data android:mimeType="*/*" />
                <data android:pathPattern=".*\\.txt" />
                <data android:host="*" />
            </intent-filter>
            <intent-filter>
                <action android:name="android.intent.action.PICK" />

                <category android:name="android.intent.category.DEFAULT" />
                <category android:name="android.intent.category.BROWSABLE" />

                <data android:scheme="file" />
                <data android:mimeType="*/*" />
                <data android:pathPattern=".*\\.rtf" />
                <data android:host="*" />
            </intent-filter>
            <intent-filter>
                <action android:name="android.intent.action.PICK" />

                <category android:name="android.intent.category.DEFAULT" />
                <category android:name="android.intent.category.BROWSABLE" />

                <data android:scheme="file" />
                <data android:mimeType="*/*" />
                <data android:pathPattern=".*\\.java" />
                <data android:host="*" />
            </intent-filter>
            <intent-filter>
                <action android:name="android.intent.action.PICK" />

                <category android:name="android.intent.category.DEFAULT" />
                <category android:name="android.intent.category.BROWSABLE" />

                <data android:scheme="file" />
                <data android:mimeType="*/*" />
                <data android:pathPattern=".*\\.xml" />
                <data android:host="*" />
            </intent-filter>
            <intent-filter>
                <action android:name="android.intent.action.PICK" />

                <category android:name="android.intent.category.DEFAULT" />
                <category android:name="android.intent.category.BROWSABLE" />

                <data android:scheme="file" />
                <data android:mimeType="*/*" />
                <data android:pathPattern=".*\\.html" />
                <data android:host="*" />
            </intent-filter>
        </activity>
        <activity
            android:name="com.example.notepad.NoteActivity"
            android:label="@string/title_activity_note"
            android:configChanges="orientation"
            android:parentActivityName="MainActivity" >
            <meta-data
                android:name="android.support.PARENT_ACTIVITY"
                android:value="MainActivity" />
        </activity>
    </application>

</manifest>


Download the apk file of the NotePad app

Tuesday, October 29, 2013

Call of Duty®: Strike Team v1.0.21.39904 APK free download


Call of Duty®: Strike Team play.google.com.striketeam
Fully customize your squad’s loadouts and abilities before leading them into combat in diverse gameplay environments. Call of Duty®: Strike Team features the revolutionary ability to dynamically switch from run-and-gun first-person view to reconnaissance and coordinated squad attacks in third-person view.
The year is 2020. Tensions run high amongst the world’s superpowers. In a surprise attack, the U.S. finds themselves in a war with an unknown enemy. Your mission is to lead a Joint Special Operations Team in a global effort to hunt down those responsible.
Play your way. Switch between first-person and third-person action at almost any time. Strategically customize the members of your squad with weapons, perks or body armor.
CAMPAIGN MODE: Experience an immersive single-player campaign full of epic, cinematic moments in diverse locations around the world.
SURVIVAL MODE: Put your skills to the test as you fight off waves of increasingly difficult enemies. Compete against family, friends and the Call of Duty®: Strike Team community for leaderboard domination.© 2013 Activision Publishing, Inc. ACTIVISION and CALL OF DUTY are trademarks of Activision Publishing, Inc. All other trademarks and trade names are the properties of their respective owners. By downloading, installing or using this App, you agree to Activision’s privacy policy, as may be updated by Activision from time to time. Please visithttp://www.activision.com/privacy/en/privacy.html to view Activision’s privacy policy.
Required Android O/S : 2.0.1+
Screenshots :


Download : 875Mb (APK+OBB)
Instructions: 
  • Install APK
  • Copy ‘com.activision.callofduty.striketeam’ folder to ‘sdcard/Android/obb/’
  • Launch the game
Download

Part 1 Part 2 Part 3 Part 4 Part 5


Call of Duty: Strike Team v1.0.22.39915 Apk + Data


Call of Duty®: Strike Team delivers an all-new, first-person and third-person Call of Duty® experience built from the ground up for mobile and tablet devices. Fully customize your squad’s loadouts and abilities before leading them into combat in diverse gameplay environments.

Call of Duty®: Strike Team features the revolutionary ability to dynamically switch from run-and-gun first-person view to reconnaissance and coordinated squad attacks in third-person view.

The year is 2020. Tensions run high amongst the world’s superpowers. In a surprise attack, the U.S. finds themselves in a war with an unknown enemy. Your mission is to lead a Joint Special Operations Team in a global effort to hunt down those responsible.

Play your way. Switch between first-person and third-person action at almost any time. Strategically customize the members of your squad with weapons, perks or body armor.
CAMPAIGN MODE: Experience an immersive single-player campaign full of epic, cinematic moments in diverse locations around the world.
SURVIVAL MODE: Put your skills to the test as you fight off waves of increasingly difficult enemies. Compete against family, friends and the Call of Duty®: Strike Team community for leaderboard domination.

Like it on   / g+, to UNLOCK the game/app
Why do I have to Unlock?

Shooting Expert


Shooting Expert is a simple shooting game.Sight a target and start shooting bottles, poppers and other targets. Become an expert in handgun shooting.
Control the handgun and shoot at targets using sensors, for more natural way of shooting. In the beginning it might be difficult, but the sensor is the best choice for fast shooting in this game. Enjoy!
Shoot targets. Be quick, be precise and win. Become a Shooting Expert!


Nihilus' Reversing DexGuard 5.x

Here's another tutorial kindly written by Nihilus.

It's a teardown of reversing DexGuard's protections, which are legion, along with some of the thought process behind it. I like it because it's pure reversing -- no cracking of the commercial app.

https://mega.co.nz/#!s8MgkDyY!Qd36YVri66wLN1mXFRCQrlebNnxqRKT-ftrlpybCs80

Kindly post feedback if you're so inclined, and contact me if you'd like to share your reversing knowledge :D

Monday, October 28, 2013

TeamViewer For Android


 You can via the Internet from any PC remote control PC software is well known for Team Viewer. Computer could only be controlled from the computer via Team Viewer . Now you can work with mobile .
Team Viewer remote control available  to the iPhone version and Windows version .  Team Viewer Is the Best Android Apps . There is a free version and the Pro version . There is a free version of the all Features here .  

Installing  


Screenshot 


Features:

1. The computer operating system (Windows, Mac, Linux) with the mobile bharsanera remote service works.

 2. These Apps can be used as a telephone call.

3. Any file that can be transferred to a computer or a mobile phone through the Apps.

4. Left click on the mobile version of the computer, right-click, drag-and-drop, scroll wheel and zoom feature.

5. What Special  with keyboard support such as ctrl, Alt .

6. Security systems have many features .

7. Can be Remote reboot of the system .


Sunday, October 27, 2013

Assignment Manager

This is an Assignment Manager app for students. The Assignment Manager app can be used to store information about your assignments and people in each assignment. You can add new assignments to the database or delete assignments from the database. It will alert you three days in advance before the deadline of the assignment. It allows you to add people to an assignment and delete people from the assignment. You are easily to share information about the assignment and group members with file attachment to all members in the assignment.
To start developing the Assignment Manager app, you need to create a new project in Eclipse. This application name will be called AssMger. There are two activities in this app. The first one, the main activity or user interface that lists the recent added assignments, allows the user to add new assignments to the database, to delete assignments from the databases, and to open another activity to manage people in the selected assignment.

assignment manager main interface


By pushing the detail button (>>) next to the assignment, the assignment detail will be shown on the dialog. Each assignment contains the following information: id, topic, description, lecturer/teacher name, room number/code, and deadline.

assignment detail


To open the user interface for managing the members in the assignment, you will push the member button (next to the detail button). These buttons are available only if there is at least one assignment in the list.

The SherlockFragmentActivity class is used to construct the main interface. The AManager class extends SherlockFragmentActivity to represent the main interface.The layout file of the AManager class simply contains a FrameLayout. The FrameLayout is the container of all sub-interfaces. This layout file is called activity_amanager.xml. You can download all layout files in this app from here.

activity_amanager.xml

<?xml version="1.0" encoding="utf-8"?>
<FrameLayout xmlns:android="http://schemas.android.com/apk/res/android"
android:id="@+id/ass_fragment_container"
android:layout_width="match_parent"
android:layout_height="match_parent"
/>


On the main interface, there are two sub-interfaces that will be added and removed dynamically. One sub-interface is defined by the AssListFragment class that extends the SherlockFragment class. This sub-interface will be shown when the showAssList method of the AManager class method is called. The layout file (asslist_view.xml file) of the AssListFragment class contains a ListView component.

asslist_view.xml file

<LinearLayout xmlns:android="http://schemas.android.com/apk/res/android"
    xmlns:tools="http://schemas.android.com/tools"
    android:layout_width="match_parent"
    android:layout_height="match_parent"
    android:orientation="vertical"
    android:background="@drawable/back_style"
>

 
    <ListView
        android:id="@+id/ass_list"
        android:layout_width="match_parent"
        android:layout_height="wrap_content"
        >
     
    </ListView>

</LinearLayout>


The ListView component is used to display assignment icon, assignment id, detail button, and member button. So each item of the ListView contains four elements. Here is the content of listlayout.xml file that defines the four elements of the ListView.

listlayout.xml file

<?xml version="1.0" encoding="utf-8"?>
<!--  Single List Item Design -->
<LinearLayout xmlns:android="http://schemas.android.com/apk/res/android"
    android:layout_width="fill_parent"
    android:layout_height="wrap_content"
    android:orientation="horizontal"
    android:padding="5dip" >

<ImageView
    android:id="@+id/icon"
    android:layout_width="30dp"
    android:layout_height="30dp"
    android:padding="5sp"
    android:contentDescription="@string/image_des"
 />

<TextView
    android:id="@+id/key"
        android:layout_width="120dp"
        android:layout_height="wrap_content"
        android:padding="10sp"
        android:textSize="20sp"
        android:textColor="#0000ff"
        android:textStyle="bold" >
</TextView>
<Button
    android:id="@+id/btdetail"
        android:layout_width="wrap_content"
        android:layout_height="wrap_content"
        android:padding="10sp"
        android:textSize="20sp"
        android:textColor="#0000ff"
        android:textStyle="bold"
        android:onClick="showDetail"  
  android:focusable="false"
  android:background="@drawable/bt_style"
 
         >
</Button>

<Button
    android:id="@+id/btmember"
        android:layout_width="wrap_content"
        android:layout_height="wrap_content"
        android:padding="10sp"
        android:textSize="20sp"
        android:textColor="#0000ff"
        android:textStyle="bold"
        android:onClick="linkToMember"  
  android:focusable="false"
  android:background="@drawable/bt_style"
  android:drawableLeft="@drawable/people_small"
 
         />

</LinearLayout>


Each button has the same background style. The background style for all buttons in this applications is defined in the bt_style.xml file that is stored in the drawable folder.

bt_style.xml file

<?xml version="1.0" encoding="utf-8"?>
<selector xmlns:android="http://schemas.android.com/apk/res/android">
    <item android:state_pressed="true" >
        <shape>
            <solid
                android:color="#ff00ff" />
            <stroke
                android:width="1dp"
                android:color="#171717" />
            <corners
                android:radius="3dp" />
            <padding
                android:left="10dp"
                android:top="10dp"
                android:right="10dp"
                android:bottom="10dp" />
        </shape>
    </item>
    <item>
        <shape>
            <gradient
                android:startColor="#000000"
                android:endColor="#000000"
                android:angle="270" />
            <stroke
                android:width="1dp"
                android:color="#171717" />
            <corners
                android:radius="1dp" />
            <padding
                android:left="10dp"
                android:top="10dp"
                android:right="10dp"
                android:bottom="10dp" />
        </shape>
    </item>
</selector>

The ListModelAdapter class that represents the data source of the ListView is defined in the ListAdapterModel.java file. If you are new to the ListView customization, you will need to read FileChooser page.
By pushing the detail button (>>) , the showDetail method of the AManager class displays the detail of the assignment in a dialog. The dialog is displayed by calling the showAlert method of the MessageAlert class that is defined in the MessageAlert.java file.

MessageAlert.java file

package com.example.assmger;

import android.app.AlertDialog;
import android.content.Context;
import android.content.DialogInterface;
import android.content.DialogInterface.OnClickListener;
import android.view.View;

public class MessageAlert {
private View view;
private Context context;
MessageAlert(View view, Context context){
this.view=view;
this.context=context;

}
//This method will be invoked to display alert dialog
    public void showAlert(String title){
   
    AlertDialog.Builder builder = new AlertDialog.Builder(context);
        builder.setMessage(title);
        builder.setCancelable(true);
        builder.setView(view);
        builder.setPositiveButton("OK", new OnClickListener(){
        public void onClick(DialogInterface dialog, int which) {
          dialog.dismiss();
          }

        });
     
        AlertDialog dialog = builder.create();      
        dialog.show();
   
    }
}


When the member button (represented by the human icon) is clicked, the linkToMember of the AManager class is called to open another activity that lets you add members to the database, delete members from the database, and share information to all members in the assignment.
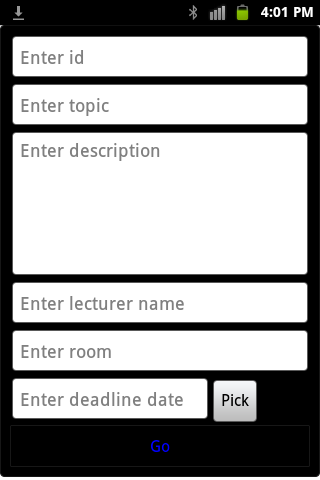
Another sub-interface allows you to add a new assignment to the database. This sub-interface defined by the AddAssFragment class displays when the user touches the new icon from the action bar. The showAddAssForm of the AManager class is called to display the sub-interface. On this interface, you will fill all required information about the new assignment and press the Go button to invoke the addAss method of the AManager class to add the assignment information to the database.

add new assignment


The items (represented by the new and delete icons) of the action bar are defined in the amanager.xml file that is in the menu folder. All icons of the items are stored in the drawable folder. You can download them from here. The new icon will be pushed to pop up a form that lets the user fill in the assignment information and add the information to the database. By selecting an assignment from the list and pressing the delete icon, the deleteAss method of the AManger class will be invoked to delete the assignment from the database. This will also delete all people in the assignment from the database. In this app, the SherlockActionBar library is used to set up the action bar so you need to import the SherlockActionBar project in to the Assignment Manager app. If you are new to SherlockActionBar, please read the TextViewer post. It helps you get start setting up action bar by using the SherlockActionBar library.

amanager.xml file

<menu xmlns:android="http://schemas.android.com/apk/res/android"
    style="@style/Theme.Sherlock"
    >
 
    <item
        android:id="@+id/addass"
        android:title="@string/item_add"
        android:icon="@drawable/new_ass"
        android:showAsAction="always"
        style="@style/Theme.Sherlock"
    />
    <item
        android:id="@+id/deleteass"
        android:title="@string/item_delete"
        android:showAsAction="always"
        android:icon="@drawable/delete_ass"
        style="@style/Theme.Sherlock"
    />


</menu>


Another activity is called MManager class. It is defined in the MManager.java file. The second activity is launched when the user clicks the member button from the main activtivity (AManager). The second activity allows you to add people to the selected assignment, delete people from the assignment, and share information about assignment and people with file attachment to all people in the assignment. Similarly, on the MManager activity there are two sub-activities or interfaces. One sub-activity that extends the SheklockFragment class is called MemListFragment. This sub-interface shows a list of people in the assignment. Here is the content of the MemListFragment.java file and its resource layout file (memlist_view.xml).

MemListFragment.java file

package com.example.assmger;

import com.actionbarsherlock.app.SherlockFragment;

import android.os.Bundle;
//import android.support.v4.app.Fragment;
import android.view.LayoutInflater;
import android.view.View;
import android.view.ViewGroup;
public class MemListFragment extends SherlockFragment {
public View onCreateView(LayoutInflater inflater, ViewGroup container,
Bundle savedInstanceState) {
// Inflate the layout for this fragment
return inflater.inflate(R.layout.memlist_view, container, false);
}

public static MemListFragment newInstance(String str){

return(new MemListFragment());
}


}


memlist_view.xml file

<LinearLayout xmlns:android="http://schemas.android.com/apk/res/android"
    xmlns:tools="http://schemas.android.com/tools"
    android:layout_width="match_parent"
    android:layout_height="match_parent"
    android:orientation="vertical"
    android:background="@drawable/back_style"
>

 
    <ListView
        android:id="@+id/mem_list"
        android:layout_width="match_parent"
        android:layout_height="wrap_content"
   
        >
     
    </ListView>

</LinearLayout>


If you want to view the detail about a person, click the detail button (>>) next to the name of that person. This will show a dialog that contains the detail about the person.


member detail


The ListView used in the MemListFragment also must be customized to show the human icons, person's names, and the detail buttons. So each item of the ListView has three components that need to be defined in its listlayout_member.xml file. The data source of the ListView is defined by the ListAdapterModelMember class. Click here to download the ListAdapterModelMember class.java file.

listlayout_member.xml file

<?xml version="1.0" encoding="utf-8"?>
<!--  Single List Item Design -->
<LinearLayout xmlns:android="http://schemas.android.com/apk/res/android"
    android:layout_width="fill_parent"
    android:layout_height="wrap_content"
    android:orientation="horizontal"
    android:padding="5dip" >

<ImageView
    android:id="@+id/icon"
    android:layout_width="30dp"
    android:layout_height="30dp"
    android:padding="5sp"
    android:contentDescription="@string/image_des"
 />

<TextView
        android:id="@+id/mem_name"
        android:layout_width="180dp"
        android:layout_height="wrap_content"
        android:padding="10sp"
        android:textSize="20sp"
        android:textColor="#0000ff"
        android:textStyle="bold" >
</TextView>
<Button
        android:id="@+id/btmemberdetail"
        android:layout_width="wrap_content"
        android:layout_height="wrap_content"
        android:padding="10sp"
        android:textSize="20sp"
        android:textColor="#0000ff"
        android:textStyle="bold"
        android:onClick="showDetail"  
        android:focusable="false"
        android:background="@drawable/bt_style"
         >
</Button>

</LinearLayout>


The MManager class also has its own layout file that will be used as the container of all its sub-interfaces. This layout file is called activity_mmanager.xml file.

activity_mmanager.xml file

<?xml version="1.0" encoding="utf-8"?>
<FrameLayout xmlns:android="http://schemas.android.com/apk/res/android"
android:id="@+id/mem_fragment_container"
android:layout_width="match_parent"
android:layout_height="match_parent"

/>

Another sub-activity or interface is defined by the AddMemFragment class. This sub-activity allows you to fill in the required information about a person of the assignment and add the person in the database. Here is the content of the AddMemFragment class and its layout file (mem_add.xml).

AddMemFragment.java file

package com.example.assmger;

import android.app.Activity;
import android.os.Bundle;
import android.support.v4.app.Fragment;
import android.view.LayoutInflater;
import android.view.View;
import android.view.ViewGroup;
import android.widget.ArrayAdapter;
import android.widget.Spinner;


public class AddMemFragment extends Fragment {
public View onCreateView(LayoutInflater inflater, ViewGroup container, Bundle savedInstanceState) {
// Inflate the layout for this fragment

return inflater.inflate(R.layout.mem_add, container, false);
}
public static AddMemFragment newInstance(String str){
return(new AddMemFragment());
}


public void onAttach(Activity activity){
super.onAttach(activity);
}

public void onStart(){
super.onStart();
setUpSpinnerData();
}
public void setUpSpinnerData(){
    Spinner sp=(Spinner)getActivity().findViewById(R.id.sex_spinner);
    String[] items={"F","M"};
    ArrayAdapter<String> aa=new ArrayAdapter<String>(getActivity(),R.layout.spinner_style,items);
    sp.setAdapter(aa);
   
    }

}

mem_add.xml file

<?xml version="1.0" encoding="utf-8"?>
<ScrollView xmlns:android="http://schemas.android.com/apk/res/android"
    xmlns:tools="http://schemas.android.com/tools"

     android:layout_width="match_parent"
     android:layout_height="match_parent"
 
     >  

<LinearLayout
    android:layout_width="match_parent"
    android:layout_height="wrap_content"
    android:orientation="vertical"
    android:background="@drawable/back_style"
    >

    <EditText
        android:id="@+id/member_name"
        android:layout_width="fill_parent"
        android:layout_height="wrap_content"
        android:hint="@string/member_name" />


    <Spinner
android:id="@+id/sex_spinner"
android:layout_width="wrap_content"
android:layout_height="wrap_content" />
 
    <EditText
        android:id="@+id/member_phone"
        android:layout_width="match_parent"
        android:layout_height="wrap_content"
        android:hint="@string/member_tel"
        android:inputType="phone" />

     <EditText
         android:id="@+id/member_email"
         android:layout_width="match_parent"
         android:layout_height="wrap_content"
         android:hint="@string/member_email"
         android:inputType="textEmailAddress" />

     <EditText
        android:id="@+id/member_task"
        android:layout_width="match_parent"
        android:layout_height="100dp"
        android:gravity="top"
        android:hint="@string/member_task" />

 
<Button
   android:id="@+id/bt_addmember"
android:layout_width="match_parent"
android:layout_height="wrap_content"
android:text="@string/bt_save"
android:textColor="#0000ff"
android:background="@drawable/bt_style"
android:onClick="addMember" />

</LinearLayout>
</ScrollView>


The MManager activity also has the action bar. The action bar contains three items that are defined in the mmanager.xml file stored in the menu folder.

mmanager.xml file

<menu xmlns:android="http://schemas.android.com/apk/res/android"
    style="@style/Theme.Sherlock"
    >
 
    <item
        android:id="@+id/addmember"
        android:title="@string/item_add"
        android:icon="@drawable/people"
        android:showAsAction="always"
        style="@style/Theme.Sherlock"
    />
    <item
        android:id="@+id/deletemember"
        android:title="@string/item_delete"
        android:showAsAction="always"
        android:icon="@drawable/delete_ass"
        style="@style/Theme.Sherlock"
    />
      <item
        android:id="@+id/share"
        android:title="@string/item_share"
        android:showAsAction="always"
        android:icon="@drawable/share_ass"
        style="@style/Theme.Sherlock"
    />


</menu>

The first item of the action bar is the new icon. It will be touched to show the AddMemFragment interface by calling the addMember method of the MManager class.

add new member

By clicking the delete icon, the selected person will be removed from the assignment by calling the deleteMemer method of the MManager class. The last item allows you to display the file chooser dialog for file attachment and send all information about the selected assignment and its members with file attachment to all members in the assignment by calling the sendEmail method of the MManager class.

attach file chooser


The FileChooser class is constructed as sub class of the MManager class to show the file chooser dialog and handle file and folder section. The FileChooser also use a ListView component to display files and folders for selection. This ListView also customized to display both icons and text. Here is the content of the layout file of the ListView used in the FileChooser class.

listlayout_filechooser.xml file

<?xml version="1.0" encoding="utf-8"?>
<!--  Single List Item Design -->
<LinearLayout xmlns:android="http://schemas.android.com/apk/res/android"
    android:layout_width="fill_parent"
    android:layout_height="wrap_content"
    android:orientation="horizontal"
    android:padding="5dip"
 
    >


<ImageView
    android:id="@+id/icon"
    android:layout_width="30dp"
    android:layout_height="30dp"
    android:padding="5sp"
    android:contentDescription="@string/image_des"
 />

<TextView
    android:id="@+id/label"
        android:layout_width="wrap_content"
        android:layout_height="wrap_content"
        android:padding="10sp"
        android:textSize="20sp"
        android:textStyle="bold" >
</TextView>
</LinearLayout>


For the complete code of the ListAdapterModelFileChooser class that acts as the data source of the ListView can be download from here.
There are some string variables that are used in different layout files of the app. These string variables are defined in the strings.xml file. Here is the content of the strings.xml file.

strings.xml file

 <?xml version="1.0" encoding="utf-8"?>
<resources>

    <string name="app_name">AssMger</string>
    <string name="action_settings">Settings</string>
    <string name="hello_world">Hello world!</string>
    <string name="title_activity_amanager">AManager</string>
    <string name="title_activity_mmanager">MManager</string>
    <string name="ass_id">Enter id</string>
    <string name="ass_topic">Enter topic</string>
    <string name="ass_des">Enter description</string>
    <string name="ass_lecturer">Enter lecturer name</string>
    <string name="ass_room">Enter room</string>
    <string name="ass_deadline">Deadline</string>
    <string name="ass_days">How many days to alert before the deadline reaches?</string>
    <string name="bt_pickdate">Pick</string>
    <string name="member_name">Enter name</string>
    <string name="member_tel">Enter phone</string>
    <string name="member_email">Enter email</string>
    <string name="member_task">Enter tasks to do</string>
    <string name="bt_save">Go</string>
    <string name="item_add">Add</string>
    <string name="item_delete">Delete</string>
    <string name="item_share">Share</string>
    <string name="bt_pick">Pick</string>
    <string name="image_des">Icon Image</string>
</resources>

Setup Notification for the Assignment Manager

As i mentioned above, the Assignment Manager is able to alert the user three days in advance before the deadline is reached. In Android, we can accomplish this task by using the AlarmManager class and NotificationManager class. The AlarmManager class is used to schedule the date and time to notify the user. The NotificationManager class will be used to handle the notification to the user at the specified date and time.

In the AManager, there is a method called setUpAlarm. This method will be invoked immediately after a new assignment is added to the database. This method accepts the number of days between the current date and the deadline to be its argument. This number of days will be subtracted by 3. The result of the subtraction will be added to the Carlendar object so that the date to alert the user is in the future that is three days before the deadline. The number of days between the current date and the deadline is calculated by using the Days class of the Joda-Time library. You need to copy and paste the Joda-Time library jar file to the lib folder of the project.
The setUpAlarm method specifies the PendingIntent object and the date and time to send this intent object to the broadcast receiver. This date and time will be three days before the deadline of the assignment. The broadcast receiver defined in MyReceiver class that extends the BroadcastReceiver class will get the intent object sent from the alarm mamanager. Then the notification object is constructed to handle the notification to the user. Here is the content of the MyReceiver class.

MyReceiver.java file

package com.example.assmger;

import android.app.Notification;
import android.app.NotificationManager;
import android.app.PendingIntent;
import android.content.BroadcastReceiver;
import android.content.Context;
import android.content.Intent;
import android.support.v4.app.NotificationCompat;


public class MyReceiver extends BroadcastReceiver {
private static final int MY_NOTIFICATION_ID=1;
    NotificationManager notificationManager;
    Notification myNotification;
 
 
public void onReceive(Context c, Intent i) {
         PendingIntent pi = PendingIntent.getBroadcast(c, 0, new Intent("com.example.assmger"),0 );
         myNotification=new NotificationCompat.Builder(c)
         .setContentTitle("Your assignment dealine is comming soon.")
         .setContentText("Assignment Notification")      
         .setTicker("Notification!")
         .setWhen(System.currentTimeMillis())
         .setContentIntent(pi)
         .setDefaults(Notification.DEFAULT_SOUND)                      
         .setAutoCancel(true)
         .setSmallIcon(R.drawable.assmanager)
         .build();
         
         notificationManager = (NotificationManager)c.getSystemService(Context.NOTIFICATION_SERVICE);
         notificationManager.notify(MY_NOTIFICATION_ID, myNotification);
       
         }
}


This broadcast receiver has to register in AndroidManifest.xml file so that it can receive the intent sent from the alarm manager. The content of the AndroidManifest file is modified to the following.

AndroidManifest.xml file

<?xml version="1.0" encoding="utf-8"?>
<manifest xmlns:android="http://schemas.android.com/apk/res/android"
    package="com.example.assmger"
    android:versionCode="1"
    android:versionName="1.0" >

    <uses-sdk
        android:minSdkVersion="8"
        android:targetSdkVersion="17" />

    <uses-permission android:name="android.permission.READ_PHONE_STATE" />
    <uses-permission android:name="android.permission.WAKE_LOCK" />

    <application
        android:allowBackup="true"
        android:icon="@drawable/assmanager"
        android:label="@string/app_name"
        android:theme="@style/Theme.Sherlock.Light.DarkActionBar" >
        <activity
            android:name="com.example.assmger.AManager"
            android:label="@string/app_name"
            android:configChanges="orientation"
             >
            <intent-filter>
                <action android:name="android.intent.action.MAIN" />

                <category android:name="android.intent.category.LAUNCHER" />
            </intent-filter>
        </activity>

        <receiver android:name="com.example.assmger.MyReceiver" >
            <intent-filter>
                <action android:name="com.example.assmger" />
            </intent-filter>
        </receiver>

        <activity
            android:name="com.example.assmger.MManager"
            android:label="@string/title_activity_mmanager"
            android:configChanges="orientation"
            android:parentActivityName="com.example.assmger.AManager" >
            <meta-data
                android:name="android.support.PARENT_ACTIVITY"
                android:value="com.example.assmger.AManager" />
        </activity>
    </application>

</manifest>

Setup Database for the Assignment Manager

The Assignment Manager app uses SQLite database to store information about assignments and members of the assignments. The DataHelper class is written to help us in creating database and tables. Here is the content of the DataHelper class.

DataHelper. java file

package com.example.assmger;
import com.example.assmger.DDataScema.MetaInfo;
import com.example.assmger.DDataScema.MetaInfoMem;

import android.content.Context;
import android.database.sqlite.SQLiteDatabase;
import android.database.sqlite.SQLiteOpenHelper;

public class DataHelper extends SQLiteOpenHelper {
public static final int DATABASE_VERSION = 1;
public static final String DATABASE_NAME = "assmger.db";
private String createtbl="CREATE TABLE "+MetaInfo.TABLE_NAME+" ("+MetaInfo.COL_NAME_KEY+" TEXT PRIMARY KEY UNIQUE, "+
MetaInfo.COL_NAME_TOPIC+" TEXT, "+MetaInfo.COL_NAME_DES+" TEXT, "+MetaInfo.COL_NAME_LEC+" TEXT, "+MetaInfo.COL_NAME_ROOM+" TEXT, "
+MetaInfo.COL_NAME_DEADLINE+" TEXT)";
private static final String deletetbl="DROP TABLE IF EXISTS " + MetaInfo.TABLE_NAME;

private String createtblmem="CREATE TABLE "+MetaInfoMem.TABLE_NAME+" ("+MetaInfoMem.COL_NAME_NAME+" TEXT PRIMARY KEY UNIQUE, "+
MetaInfoMem.COL_NAME_SEX+" TEXT, "+MetaInfoMem.COL_NAME_PHONE+" TEXT, "+MetaInfoMem.COL_NAME_EMAIL+" TEXT, "+MetaInfoMem.COL_NAME_TASK+" TEXT, "+MetaInfoMem.COL_NAME_KEY+" TEXT)";

private static final String deletetblmem="DROP TABLE IF EXISTS " + MetaInfoMem.TABLE_NAME;
public DataHelper(Context context){
super(context,DATABASE_NAME,null,DATABASE_VERSION);
}

public void onCreate(SQLiteDatabase db){
db.execSQL(createtbl);
db.execSQL(createtblmem);
}

public void onUpgrade(SQLiteDatabase db,int olv,int newv){
db.execSQL(deletetbl);
db.execSQL(deletetblmem);
onCreate(db);
}


}


When you create an instance or object of the DataHelper class, its constructor is called to create a database file (if it does not exist). The onCreated method will be called automatically after you create the instance or object of the DataHelper class. This will create two tables (if they do not exist). One table is for storing the assignments' information and another one is for storing the people's information. The names of the tables and their columns or fields are defined in the DDSchema class. Here is the content of the DDSchema.java file.

DDSchema.java file

package com.example.assmger;

import android.provider.BaseColumns;

public class DDataScema {
public DDataScema(){}
public static abstract class MetaInfo implements BaseColumns{
public static final String TABLE_NAME="tblassigments";
public static final String COL_NAME_KEY="AssId";
public static final String COL_NAME_TOPIC="AssTopic";
public static final String COL_NAME_DES="AssDes";
public static final String COL_NAME_ROOM="AssRoom";
public static final String COL_NAME_LEC="Lecturer";
public static final String COL_NAME_DEADLINE="AssDeadline";

}

public static abstract class MetaInfoMem implements BaseColumns{
public static final String TABLE_NAME="tblmembers";
public static final String COL_NAME_KEY="AssId";
public static final String COL_NAME_NAME="MemName";
public static final String COL_NAME_SEX="MemSex";
public static final String COL_NAME_PHONE="MemPhone";
public static final String COL_NAME_EMAIL="MemEmail";
public static final String COL_NAME_TASK="MemTask";

}
}


The DataHelper class is used in both the AManager class and the MManager class. The readAss of the AManager method is called from the showAssList method to retrieve the assignments'information from the tblassigments table and show them on the list. Its addAss method will be called to insert the new assignment to the table.
Similarly, in the MManager class, the readMem method is called from the showMemList method to retrieve people's information from the tblmembers table. Its addMember method will be called to insert a new person'information to the table.

DatePickerDialog

On the AddAssFragment interface that allows you to fill in the new assignment information and submit the information to the database, you will see the Pick button. This button allows you to select a date from the date picker dialog. The date picker dialog can be created by using a dialog fragment class that implements the DatePickerDialog.OnDateSetListener. In the Assignment Manager app, the DateDialog class (the inner class or sub class of the AManager class) extends the SherlockFragmentDialog is written to provide the date picker dialog to the user.

date picker


Now you are ready to try the Assignment Manager app. If you have any questions, please feel free to leave them at the comment section below. You can download the Assignment Manager apk file to install on your Android device from the link below.

Download the apk file of the Assignment Manager app